Kandao Obsidian Pro In-Depth Review: vs Insta360 Titan & Blackmagic Ursa 12K w/ Test Footage
by Hugh Hou
by Hugh Hou
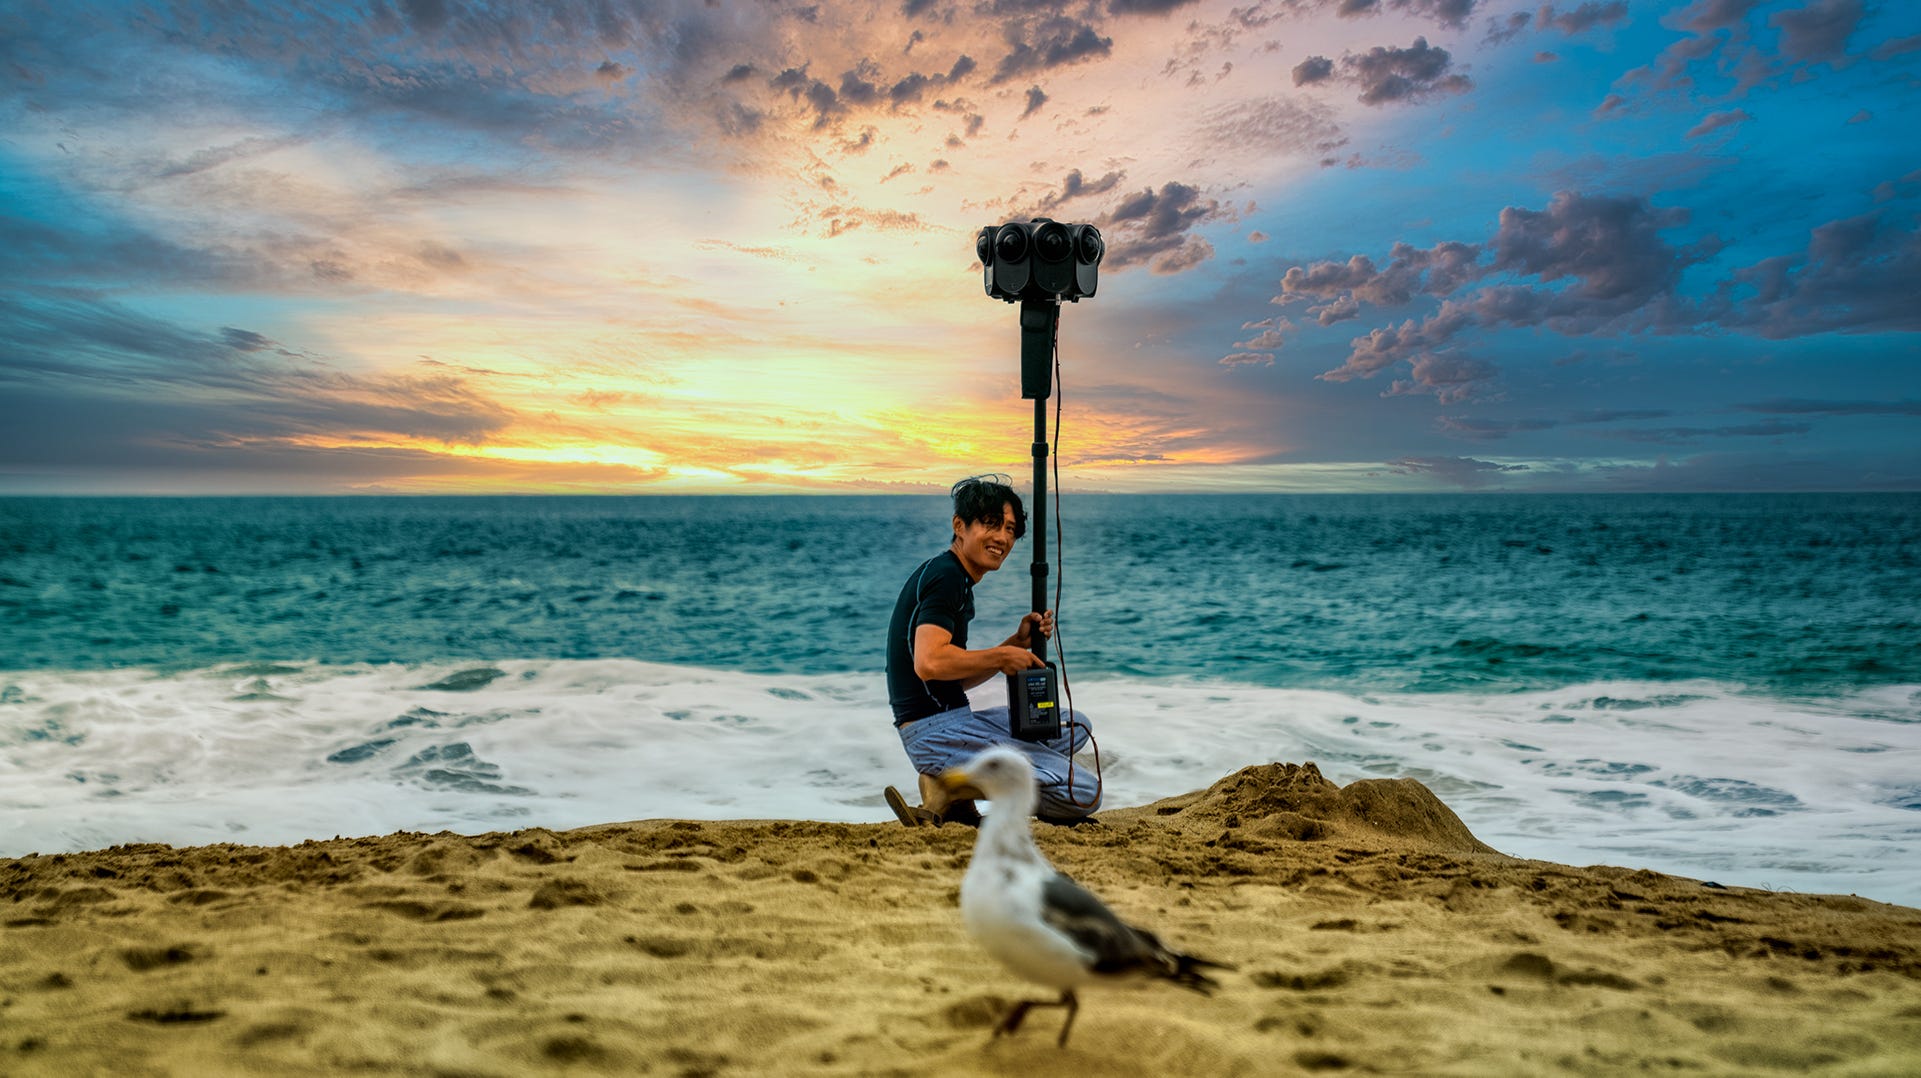
In the past 4 weeks, we have had the unique opportunity to test out a $35,000 VR camera. The Kandao Obsidian Pro was interesting to try out in the field. We took this 30 pounds of metal EVERYWHERE in real-world scenarios, in different locations from Yosemite National Park to Laguna Beach. In this video, we will show you our results in comparison to the Insta360 Titan 11K VR camera and the Blackmagic Ursa Mini Pro 12K with Entaniya Fisheye lens. We will list all the pros and cons of the Obsidian Pro to help you decide if you should invest or wait.
Let’s JUMP right in:
No time to waste. Let’s jump right in the result of the side-by-side comparison of Kandao Obsidian Pro, Insta360 Titan, and Blackmagic URSA 12K. Before we start, we provided all the sample footage in 12K ProRes and 8K H.265. The download link is in the YouTube Video description. You can sideload the 8K H.265 footage directly into your Oculus Quest 2 to see the result yourself. I highly recommand you do so instead of just listening to my opinion or anyone’s opinion. Feel free to use the footage as well to showcase to your clients as a reference to help pick the right camera for your next project:
First, let’s take a look at resolution and sharpness.

From left to right, we have Kandao Obsidian Pro, Insta360 Titan, and Blackmagic 12K. Blackmagic 12K captures the highest resolution at 12288 px — that is why the picture is bigger. They are all at sensor original resolution. Obsidian Pro and Titan look the same in terms of sharpness. Blackmagic 12K looks really soft. The reason is, even tho Blackmagic 12K has the largest cinematic sensor — but it only has one sensor, and it is stretched into 200 degrees by the Entaniya HAL 200 fisheye lens. So the sharpness per pixel will be greatly reduced. That is why multiple lens VR cameras will always be sharper than front and back 2 lens cameras with a big fisheye.
Let’s zoom in 300%.
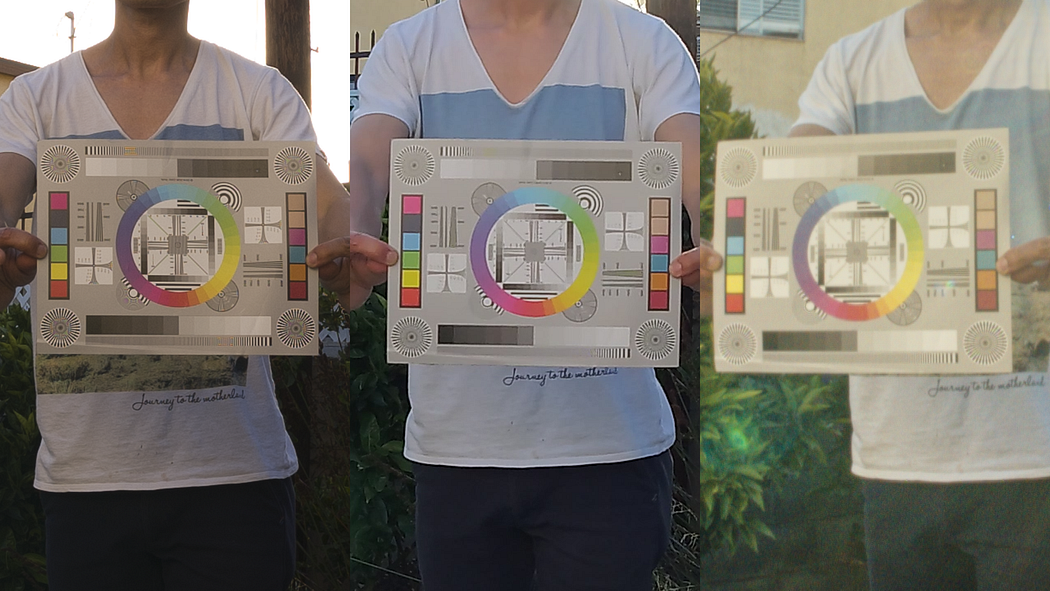
Now you really see the differences. But if you do not see the differences, this is probably due to YouTube compression. Download this PNG comparison photo onto your computer to see. The sharpness differences are not due to resolution differences as Obsidian Pro 12K is only slightly bigger than Titan 11K resolution. The visual quality difference is heavy due to compression. Titan is in H.265 — a heavily compressed format. Obsidian Pro is in RAW or ProRes 422 HQ. So the details are not compressed or throw away by the camera. This is also why Insta360 Titan still has that security camera look, but Obsidian Pro looks more close to real life. Look at my neck, my bones are mostly gone in Titan. Even tho Blackmagic 12K in Blackmagic RAW is still softer than Titan, but it looks better than Titan because it is not compressed. So the takeaway is, if you want to achieve that cinematic look in VR, you don’t want the camera to compress and throw away information. Having the ability to capture ProRes or even RAW is the KEY to have a professional, cinematic look.
Let’s zoom back out to look at the dynamic range and color bit-depth. At first glance, Titan actually has better color science out of the box than Obsidian Pro. But, when you apply color correction and color grade on the Obsidian Pro RAW footage, you immediately see the differences.
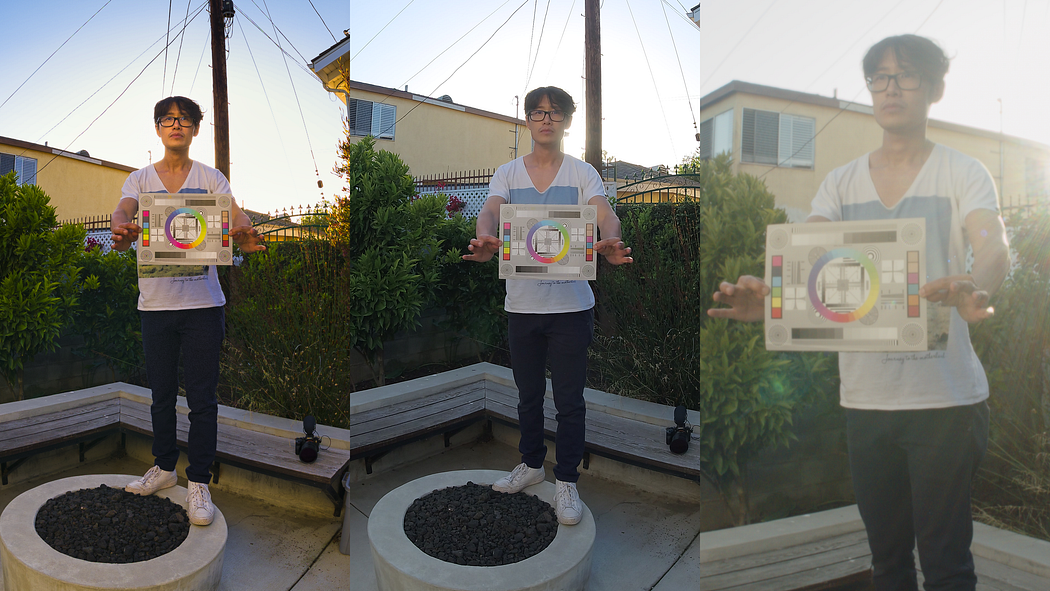
Obsidian Pro footage has a lot more room to color grade. Zoom in 300% and pay attention to the color wheel, Obsidian Pro, and Blackmagic 12K RAW both have more color definitions than Titan. As both Obsidian Pro and Blackmagic have 14-bit color depth.

In the future, if we have a VR headset with HDR color, Obisidan Pro has REC 2020 color space that is ready to be graded in beautiful HDR. So your video is future-proof.
To me, the biggest selling point of Obsidian Pro is the ability to capture 6K in 60FPS ProRes HQ. If you have not seen my 3D 360 footage captured in 6K 60FPS — check out this link right here. I will suggest watching it inside your Oculus Quest 2 on Oculus TV.
So people said the Obsidian Pro can do 12K 3D 60FPS. That is not true. In the menu settings, it does show the 12K 60fps option. But if those people actually shoot in 60fps and trying to finish it in 60fps — they will realize it is impossible without some kind of AI upscaling.
Obsidian Pro uses a very smart technique to work within its camera encoders pixels per second limitation. In 60fps, the per lens resolution is 6016 x 2012 instead of 6016 x 4024. It is basically a 2 by 1 anamorphic squeeze.

Watch this tutorial again to learn how to use Mistika VR to de-squeeze the footage. When converting the footage back to 1 by 1 square pixel, the final 3D 360 video will lose its vertical resolution, which leads to only 6K resolution.
When you want to shoot at 60FPS, we will also recommand shooting at KDRAW instead of any compressed format like ProRes or H265. The camera encoder won’t be fast enough to capture and compress the source footage at the same time — which leads to a jagged edges problem:
I want to give a huge shoutout to David Lawrence and Scott Lynch to point this problem out in my footage. The reason why I love the 360 professional videographer community. Everyone is passionate about the art and ready to jump in and help.

Kandao has already been notified of this issue, and already has above solution for the issue in KDRAW — Kandao own RAW format. ProRes and H.265 solution will be rolling out in the next release of the downloaded software.
Because of big sensors and low compression ProRes capture, Obsidian Pro is definitely the best VR camera in the low-light situation. You can see the result yourself in my 4th of July fireworks 12K 3D 360 video of Santa Monica Pier:
Here is a comparison, shot at the same time. The TOP is Obsidian Pro, and the bottom is Qoocam 8K Enterprise. You clearly see the Obsidian Pro pick up more light and have a more dynamic range. If you zoom in to the original resolution in 8K — you see a lot more details in the distance light. Qoocam 8K, on the other hand, is unusable in this extreme low light condition.
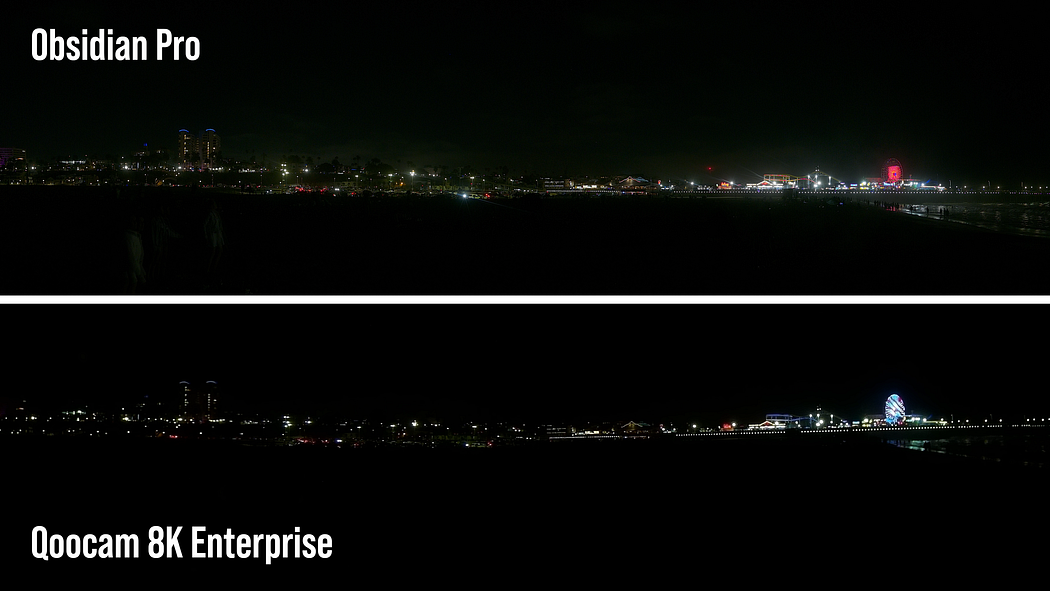
If you primary shoot in low-light situations like concerts or nighttime events, Obsidian Pro will be a great investment.
3D stitching is probably the biggest concern of Kandao Obsidian Pro due to its larger sensor and larger IPD distance. To better illustrate the problem, we have the Insta360 Titan stack on top of the Obsidian Pro. Both cameras pointing at Kimchi and Keeley in the 3D sweet spot — which is in between the lenses. We have them walking toward the camera while calling out the distance. Here is the final top and bottom 3D result in comparison:
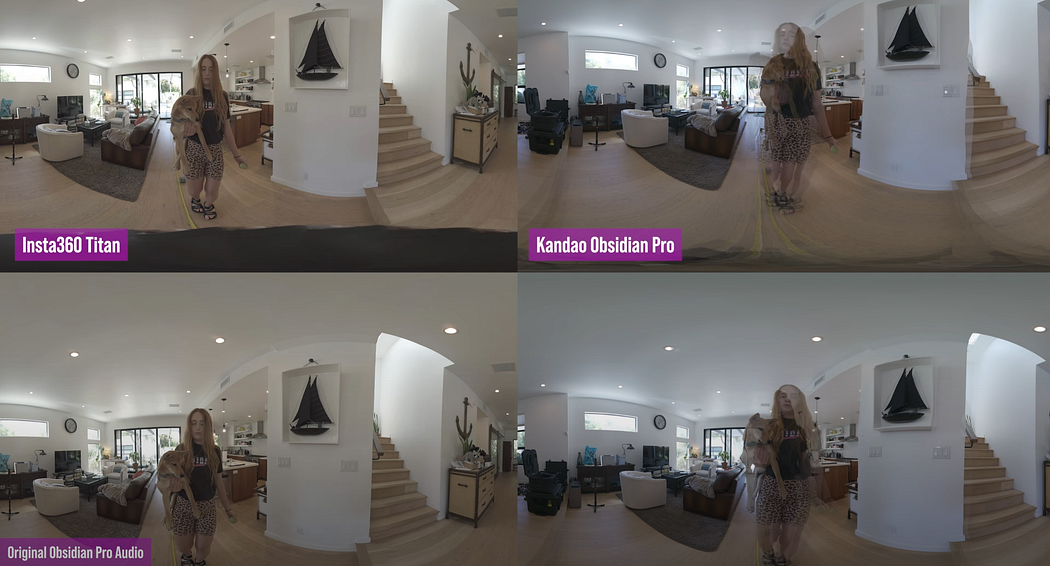
The Titan is stitched in their native Insta360Stitcher software. And Obsidian Pro is stitched in Mistika with the official template without any stereo edge point animation. Obsidian Pro already starts to break down in 10 ft on the right eye. In 2ft, Obsidian Pro has severe optical flow artifacts, and Insta360 Titan is still pretty good — a few artifacts when Kimchi out of the stereo safe zoon on the left. When they get close right against the camera, both camera footage becomes unusable — but Obsidian Pro seems worse.
Can it be fixed in post? Yes. You will need to animate stereo edge point within Mistika VR or Mistika Boutique, as you see here. Obsidian Pro has more overlap as well in 3D compared to Titan.
Another common issue is hyper stereo — everything looks a little bit different than real life. It feels like you are King Kong or some kind of giant. You can minimize these effects by changing the Convergent Distance in POST. To be fair, Insta360 Titan also suffers from this issue. Kandao said their own stitcher would have AI computer vision and depth map-based stitching. This will bring the IPD closer to the human’s eyes and solve the optical flow artifacts. But until then, shooting close-up 3D 360 is going to be lots of works in post-production.
Parallax issues and optical artifacts are not only for 3D. You can also see that in monoscopic stitching. We use the Obsidian Pro to shoot a scene in a promotional film for a real estate company in Hollywood Hills. We have the 2 actors walk around the camera in a circler stair. You see the stitching break down as well here. It gets better when the talents are getting further away from the camera. But anything within 3 meters around the stitch lines will have optical flow artifacts.
Another unique feature that is unheard of in the VR industry is Shadow depth of field in a VR camera. This is not a feature for 3D as you just learn your actors can not go near the camera within 3-meter or at least not yet until depth-map stitching is out. But for monoscopic 360 videos where you want to focus on your actors or talents — this is pretty cool. You can turn on the Near Focus feature by swiping the LED screen on the right, pick this option, and change it here to Near Focus. Near Focus, distance is 0.66-meter to 2-meter. The normal focus distance is 1-meter to infinite. Also, set your aperture to 2.8 or the lowest you can go to create more shadow depth of field. Yes, in Obsidian Pro, you can change the aperture creatively to achieve a more cinematic look. Here on the left, we have the near-focus result, and on the right, we have the normal focus result:
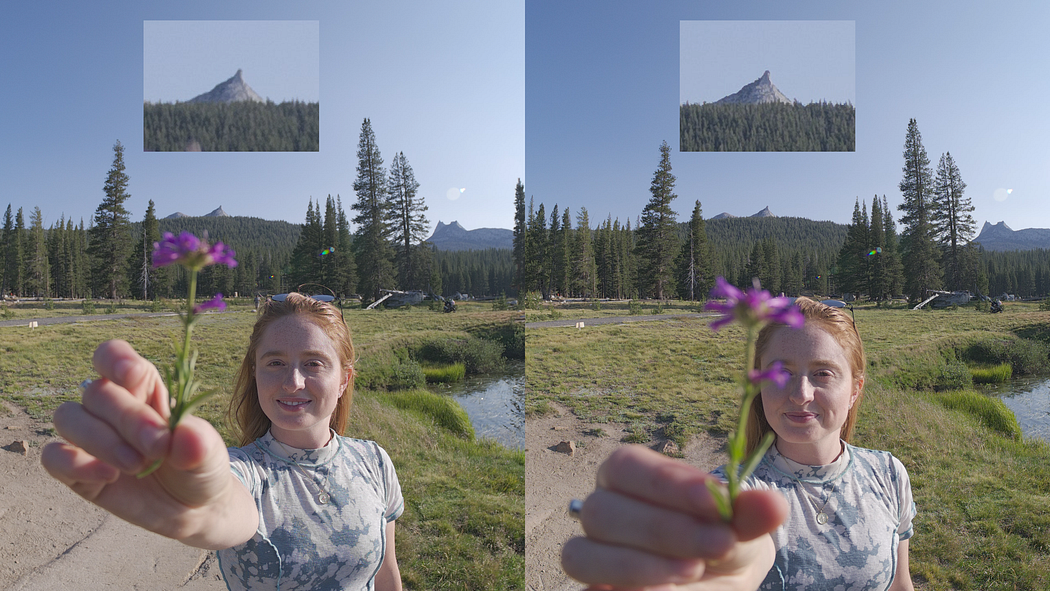
In the Near Focus result, the subject in the 1-meter range is really sharp. The background, compared to normal focus, is softer and has slightly more depth of field. It is NOT a dramatic difference compared to 2D when the background is completely out of focus. I think this is better and more natural in a VR headset. It provides the focus of attention into the near subjects but still not completely taking away what are in the background.

Also, if your subject is really close — within 1-meter range, near focus is focus a little better than normal as well. Keeley is within 1 meter range here, you can see her face is sharper in Near Focus. The flower is within 0.5-meter, so even the near focus won’t be able to focus. But compared to Normal focus, Near focus is still better in focusing close-up objects — as you can see the ring right here.
If you get this camera, I will highly recommand experiment with this feature creatively to get some close-up VR experience, at least in monoscopic. The focus distance in Near Focus is a lot better than Insta360 Titan or Blackmagic 12K with Entaniya Fishey or any fisheye.
Obsidian Pro can also take 12K 3D 360 photos in both Jpeg and DNG RAW. You are looking at it right now:
www.facebook.com
If you are doing 3D 360 virtual tour with software like 3DVista, Kandao Obsidian Pro takes the best looking 3D photo — better than the Insta360 Titan. But I think using a $25000 dollars camera to take 3D 360 photos for VR headset delivery is really overkill.
So it is not practical to shoot in 14-bit KDRAW unless you are doing Virtual Production background for LED Wall. More on that in another tutorial. Therefore, the codecs you will use the most are ProRes HQ or ProRes 422 in 10-bit color depth. In order to protect the highlights and the shadows with the best dynamic range, you will mostly shoot in HLG, Hybrid Log Gamma. And you will also pick REC 2020 color space for HDR. This is the first-ever VR camera that introduces a true HLG capture mode. Great news for the colorist. But it is still not as robust as Blackmagic RAW in the URSA 12K — with the Blackmagic Gen 5 color science. If you capture with HLG, Kandao provided a conversion LUT to turn your footage back into REC 709. I will provide a download link in this video description.
So Obsidian Pro is very heavy. I will recommand at least two people operate it at the same time. It uses external V-mount batteries — 2 of them to power the camera. You can see the battery level on display, which is very convenient. The battery I will recommand is MAXOAK 177 watt hour. Two of them can last you all day of shooting. They are also one of the cheapest V-mount batteries on Amazon. If you do not like V-mount batteries, you can also use Zendure SuperBase500 or, even better SuperBase Pro to power the Obsidian Pro directly using the power outlet plug. SuperBase Pro has solar power recharge feature — great for on-location filmmaking when there is no power source:

Go without saying, you need a very solid professional camera tripod. As you see here, Keeley is trying the crank the center pole of my tripod up with both camera, and she is not strong enough to do so. Without a center pole system and a lever, as you see here, it is very hard to raise the camera safely. I will not suggest using a bushman monopoly.
When mounting the camera, you see I am using a quick-release system. This is a Quick Release Mount from Freedom360:
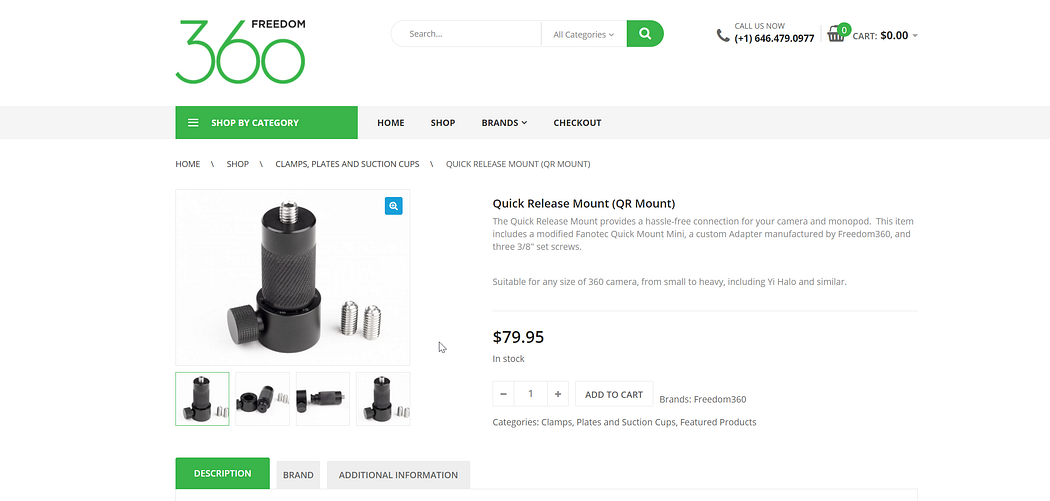
It is impossible to turn a 40-pound camera into a 3/8 screw hole. The quick-release system uses gravity to do the work for you. And you can also turn the camera after mounting to point the stereo sweet spot to your action. You also see this leveler here. A good one I recommand is Nodal Ninjas. You need a leveler that can hold the weight of this heavy camera.
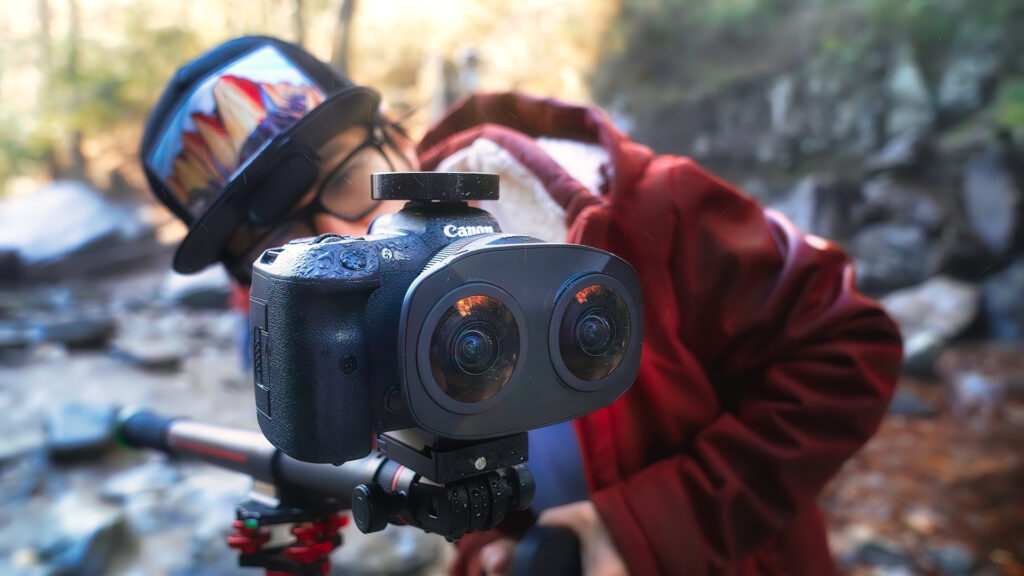
The Obsidian Pro lenses are really big. They are very easy to get dirty, especially when I am on set outside like Yosemite. Each time before you roll the camera, make sure to clean your lenses — all EIGHT of them.
This is a professional VR camera, I will suggest DP learn how to nail exposure manually with this camera. Remember you can change ISO, Shutter Speed as well as Aperture on this camera. So not like Insta360 Titan, change three variables is a challenge for a normal VR filmmaker. I will turn on Histogram right here to help you to nail the exposure.
This camera gets really HOT under the SUN. In Yosemite, after 10 minutes of capture, the camera gets so hot I can not touch even the top handle with my bare hand. I will suggest getting a pair of giraffe gloves to operate the camera.
Offloading the Obsidian Pro is very simple. There are no 9 SD cards you need to manage. Just simply plug a CAT6 ethernet cable that comes with the camera into your 10G Ethernet port, you can then use the free download tool to download the footage. After you pick the output path and start the download, you see the transfer speed is really fast. It averages around 900Mb/s. Just consider each Insta360 Titan SD card transfer speed is 90mb/s — this will save the DIT lots of time. Well, to be fair, Obsidian Pro captures a lot more data than Titan — so it will probably be the same offloading time in the end. You do need a 10G Ethernet port. Most of the old laptop does not have that. You will need to buy a 10G network card for your PC or MAC inorder to get such a fast speed. Yes, more money to spend. Price to pay to go professional. Make sure your DIT knows that as well. If you don’t know what a VR DIT does, check out this tutorial right here:
Kandao Obsidian captures RAW, ProRes 422 HQ, ProRes, ProRes LT, and H.265. If you capture RAW, your 8TB SSD will be filled up within 30 minutes — which is not practical no matter who you hire as DIT. If you capture in Kandao RAW, currently, there is no software to understand the format. So you will need to convert it into a CinemaDNG image sequence. As you see here, this is a huge waste of storage space, and process 12K CinemaDNG in Davinci Resolve — which is BTW, the only program that can decode it correctly and do color grading — require a very powerful computer. I have Nvidia Titan RTX 24G of Vram and AMD Threadripper 3990x, 128G of memory — I am still struggling in stitching and editing this footage. So, I will suggest NOT to shoot at KDRAW. Instead, you should use ProRes 422, or for a really high end project, shoot at ProRes HQ.
But don’t shoot at H.265 either. 10-bit H.265 has the same issue as Titan. Basically, when you are in Mistika VR, your stitching is basically frozen. It takes Mistika VR forever to decode and read H.265 information. For 12K in H.265, no matter how powerful your computer is, it is impossible to finish the stitch. If you want to read more about why H.265 in 10-bit sucks, watch this Mistika Boutique tutorial right here:
You will need lots of storage working with Obsidian Pro. So get ready to stock up on fast storage. If you need help on finding the best fast storage for VR editing, I will recommand checking out my 360VR Filmmaking Masterclass. SSD is not always the solution as they are really expensive:
Now you have a clear idea of the practical image quality of the Kandao Obsidian Pro compared to Titan and Blackmagic 12K, let’s talk about why you want to get this camera. Well, the short answer is, you should not buy this camera unless you are really rich or you are running a professional VR filmmaking studio like us to take on agency-level works, films, or commercials. For most independent filmmakers, rent the Obsidian Pro instead. And make sure your clients can cover the cost. Obsidian Pro, at the current stage, can not be your one side fit all cinematic VR camera. You will still need another smaller camera for close-up objects, especially for narrative film or anything requiring close-up interviews. Both stereoscopic and monoscopic.
Kandao does announce that they will release their version of the stitching solution that will have a depth-map-based stitching algorithm, just like the famous Google Jump program. If you are familiar with the Google Jump stitcher with Yi Halo, you know the 3D stitching is really good when employing the depth map technique. When the official software is available, I will do a follow-up review to re-stitch the same footage and to show you before and after comparison.
There is a lot more to cover regarding Kandao Obsidian Pro. I hope this article serves as a basic but practical introduction to Kandao Obsidian Pro. You can use the Pros and Cons mentioned in this video to decide for yourself. If you decide to go with it or rent it for your next epic VR film project, then make sure to check out my VR filmmaking masterclass — where I will have in-depth tutorial series, from pre-production to post-production on how to film with Obsidian Pro.
Follow me on Social Media to get more latest info on 360 VR filmmaking:
➜Oculus TV: https://ocul.us/2PINYMz ➜YouTube: https://www.youtube.com/creatorup ➜Facebook: https://facebook.com/360creator ➜Instagram: https://instagram.com/hugh.hou ➜TikTok: https://www.tiktok.com/@hughhou/ ➜Website: http://film360.video


