BEST Affordable Fisheye lens for 360° Virtual Tour Panorama Photography — TTArtisan 7.5mm f/2 Review
by Hugh Hou
by Hugh Hou
Introducing TTartisan 7.5mm F2.0 manual fisheye lens:
We will compare the TTAritian with another community favorite — SIGMA 8mm F3.5 for both 2D photography and 360 photography.
Not like most reviews, you saw on the Internet, I will show you some potential problems, especially the concerns for professional Virtual Tour creators. Like Lens Flare you saw here and ghosting in the high contract areas when using the ND1000 filter. And how to plan ahead to avoid those problems.
If you don’t have time to watch the entire in-depth review and the PTGui tutorial for this setup, here is what I think: I absolutely love this lens. I am so happy that I bought it, credit to some folks’ suggestion in the 360 panorama photography community. It is sharp, easy to use, and does things that none other fisheye lenses can. Like long exposure 360 photography in bright daylight with the ND1000 filter and better 360 astrophotography with the largest Aperture in the fisheye lens market. If you are curious to learn more and to level up your Virtual Tour photo quality — let’s jump right in.
TTartisan 7.5mm F2.0 manual fisheye lens is really well built with a full metal body. Very smaller compare to my Simga 8mm. It is the only fisheye I know that has a native RF mount for the Canon R5 shooter. And no matter what mirrorless camera you use, you can find a native mount to keep your setup small and nibble. It is great for travel 360 photographers like myself.
One thing I love about this lens is the handling. The aperture ring has clicks so I never worry about missing the apertures. The focus ring is very solid and never drifts like my Sigma here. When under pressure taking hundreds of 360 photos on a job, trusting your focus ring is the key.
It goes from F2 to F11. For traditional 2d photographers who love to get that beautiful bokeh, you will love this lens. It focuses at 12.5centermeter — that is the sensor to subject distance. So it can get extremely close to the subject, with the full subject in frame and beautiful bokeh in the background in Aperture F2.0:
Oh, did I mention the price? The TTArtisan 7.5mm cost only $149.00. My Sigma 8mm here cost $899, and I still need an E-mount adapter to use on my Sony Alpha 1. So it is about $1000 vs $150.
This is an APSC lens but we only care about using it with a professional mirrorless camera, like the SONY Alpha 1, SONY A7R Mark 4, or Canon R5. If you want to know why these are the best cameras for professional virtual tours or any professional photography, check out this video here:
First, for full-frame shooter, you need to know, this is not technically a 7.5mm lens. It is more like 8.32mm, according to PTGui:

As it also has some blue Vignetting around the edges. So it is more like 10mm give or take. But no worry, it will stitch effortlessly with only 3 shots, just like the other 8mm lens. I will use four shots tho with my brand new MECHA C2 from Nodal Ninjas — as you see here. You don’t need MECHA. I like MECHA is because it can be programmable — so my PTGui template with TTArtisan will always work as I expected with no surprise.
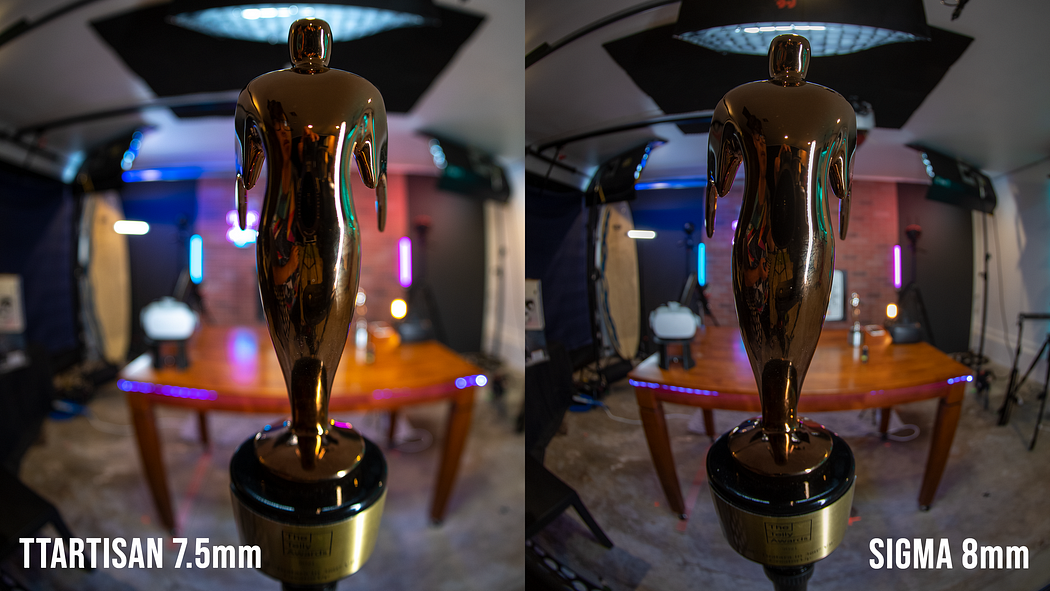
The sunshade of this lens is very small on the short side. And it can be used unshaved in vertical mode on a Full Frame sensor, which is not possible with the Samyang 8mm ƒ/2.8 and 7artisans 7.5mm ƒ/2.8. Even with the SIGMA 8mm here, which is without sunshade at all, TTArtisan in vertical FOV, you can see more in Nadir and Zenith. For those of you lazy 360 photographers out there who absolutely hate Nadir Zenith shots, this is very good news. Yes, the horizontal FOV is less than SIGMA. But since we are not doing 2 shots 360 photo like the Entaniya HAL 200, we have enough overlap to not worry about stitching.
Another noticeable advantage is the larger sensor coverage for a full-frame camera. As you see here:
This means more details for distance objects. As you see right here compared to SIGMA in both F2.8 and F8.
For close-up objects in the center, the sharpness is the same as the expensive SIGMA lens — which is very impressive. What about a wide-open aperture in F2? Let’s take a look at all the aperture in terms of center sharpness. Go to my blog post here if you want to zoom in or download this image to see in Photoshop:

For center sharpness, F2 is as sharp as another aperture, which is very impressive. This is great news for 360 timelapse astrophotographers.
What about the edges. Let’s zoom in 400% on the left edge and take a closer look:
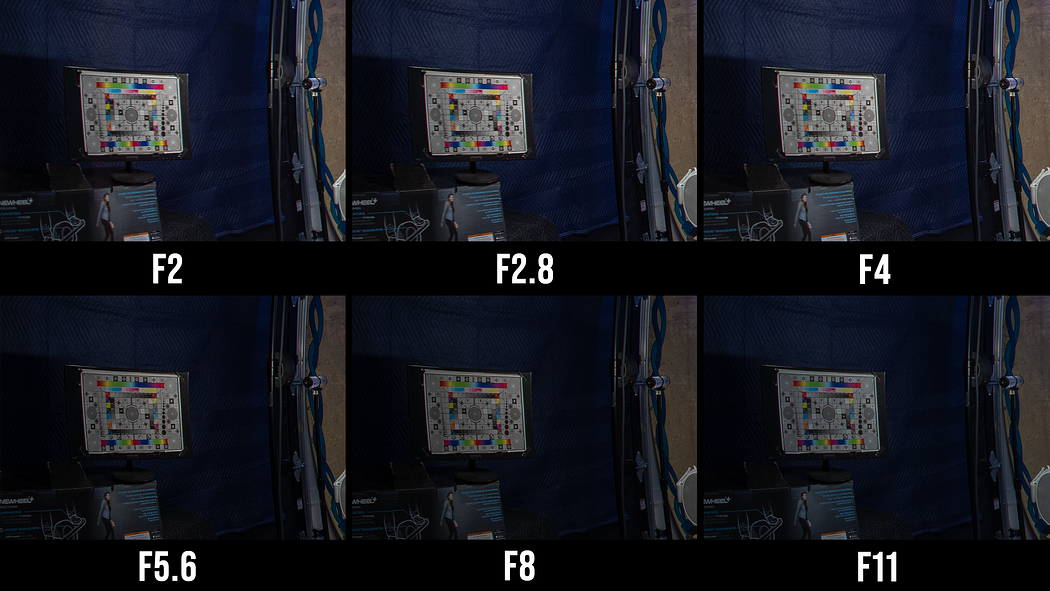
Well, in fact, let’s zoom in 800%:

F2 is soft as expected for any fisheye lens. But it is still usable. F2.8 is sharper than F2 and it is also sharper than F4 strange enough. So if you need light, I will go for F2.8 but not use F4 in any condition. F5.6 and F8 are where the lens is really sharp edge to edge. That is where you want to set in 99% of the time for 360 virtual tours. F11, diffraction starts to kick in. So I won’t use F11 either. So to recap, for TTArtisan 7.5MM, you should use F5.6 or F8 in most situations. F2.8 if you are stuck in a dark corner without light. F2 for astrophotography where the edges are mostly black anyway. Never use F4 or F11.
Compare to SIGMA, TTArtisan is sharper on the edge as well:

In this image, you also see less Chromatic aberration on the TTArtisan. This is in F5.6. If you want even less Chromatic Aberration, F8 is even better, as you see here:
I won’t worry too much about fisheye Chromatic Aberration as long as you are shooting RAW — which you should with SONY Alpha 1. Then you can just take it out with 1 button inside Adobe Lightroom.
Next, let’s talk about Sunstars:

Here are the Sunstars in all exposure. You start getting sunstars at F2.8 which is good news. If you don’t know what Sunstar is, then this feature does not concern you. If you do, and you are longing for the sunstars as your signature look in your 360 photography, then this is what you need to know. It does not have pointy sunstars like the Zeiss lens. It is kinda messy until you hit F8. So if you need sunstars with pointy look, then stay at F8.
This one I got spoiled by the SIGMA 8mm. As you see in this video, SIGMA has a very minimal lens flare. Only right here with a little red ghost. The big ring is outside of the image circle. Now take a look at TTArtisan. When the sun is directly pointing at the lens, you see all kinda flare. The red ring probably is the biggest issue. It covers the entire lens. As you see it go away immediately when the sun moved out of the center. It also has this very iconic flare when the sun is on the side. So, if you hate lens flare, try to avoid this sun location. For 360 photo with fisheye, it rarely points the sun directly into the lens except sun rise and sun set. So be mindful of that then you will be fine. The good news is this lens does not have veiling flares. If you don’t know what is veiling flare, check out your Insta360 ONE X footage while pointing the camera to the sun.
Now let’s talk about the ND1000 filter that comes with the lens. It allows you to do long exposure photography in bright daylight. As fisheye lens can not use the front ND filter. You can screw in the ND filter in the back. Here is a 360 photo taken with the ND1000 with 1.3 second exposure in ISO 250. As you see Kimchi here has a cool motion blur. Same as all the trees:
What I really want to show you in this 360 photo is the problem of the ND1000. Right here the high contract area, it looks white with ghosting. Here is the same photo without the ND1000 — as you see it should be a black shadow. You will also see double images if you go up to F11. This is shot at F5.6 so no double images. To avoid this problem, you should stay under F4 when using the ND1000 filter.
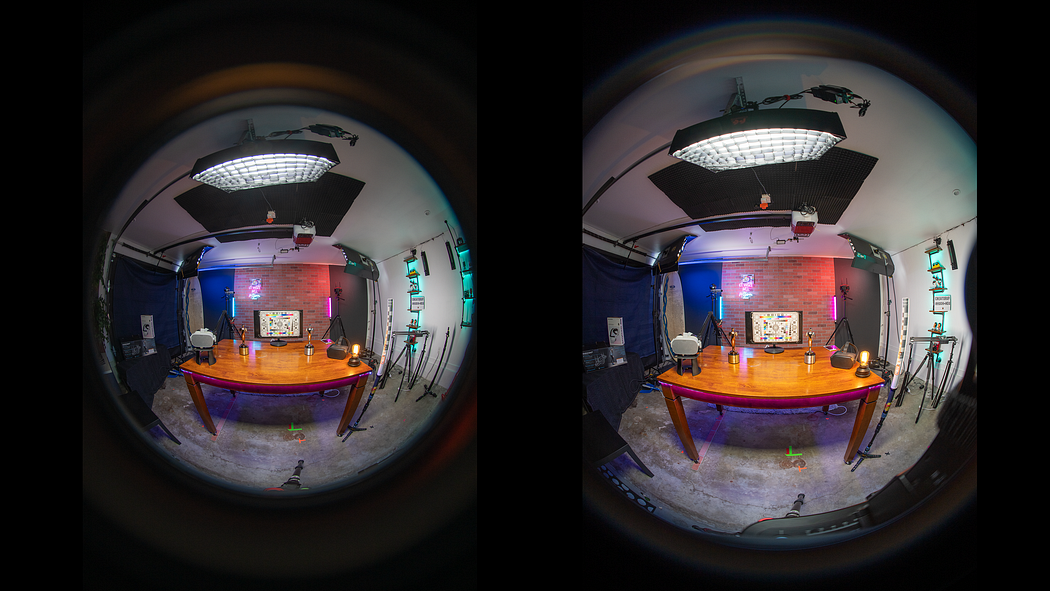
Now let’s talk about stitching and interior Virtual Tour photos:
You are looking at a 3 bracketed HDR 360 photo capture with the TTArtisan 7.5mm at F5.6. This is stitched with 4 sides and 1 zenith and 1 nadir shot. This is my recommendation for a high-end virtual tour workflow. As you see right here in PTGui if you drop in all 6 photos and pick the TTArtisans lens profile — which you need to update to the latest PTGui 12. Then all you need to do is to hit align and you get a perfectly stitched 360 pano with no error and no extra control point adjustment. It is that easy thanks to the Nodal Ninjas MECHA C2 programming and the magic of PTGui.
For most of you, you probably do not want to capture the Zenith and Nadir. So let’s delete it and check it out. Now you see PTGui can still stitch TTArtisan no problem. But if you look up in the ceiling, you see this ugly blue line. Remember I mentioned earlier this lens has a blue-ish Vignetting around the edges? So you just need to tell PTGui do not use the edge of the lens to stitch. You can simply by turning off the Find Optimum seams, and it will be better immediately. If you pan all the way up, you still see some blue tint and the tip is blue.
Now, I am going to teach you another trick in DSLR 360 photography that is usually not mentioned in beginner tutorials on the internet. This trick is going to work on ALL fisheye lens that has a discoloring zenith or ceiling have a punch like this.
All you need to do, instead of shooting the pano at 0 degree, is to tilt the lens like 5 degrees upward. In MECHA C2, it is simply to move your arm up a little bit. Then run the MECHA C2 or manually move your Nodal Ninjas 6 like usual in 3 or 4 times.
So F5.6 and F8, which should you choose if the lighting does not matter. Well, I zoom in 400% in the stitched 360 photos, as you see F8 is still slightly better than F5.6. But it is really close. If you are a perfectionist, use F8 will give you the sharpest result:
What about the ring they advertise on the website to create a full fisheye like the Sigma 8mm? So my suggestion is NEVER EVER to use that ring on a Full frame sensor. It cut out the FOV of your lens and introduce more vignetting. You won’t be able to stitch in PTGui without a zenith shot. So don’t do it.
Thank you for reading this in-depth review of the new TTArisan 7.5mm. It makes me want to shoot more mirrorless 360 photos and be more creative in 360 photography. I can’t wait to show you some of my long exposure 360 photos of nature soon on my Facebook page 360creator. If you have not already, please follow me on Facebook where I will show more creative samples of the TTArtisan with my SONY Alpha 1 and Nodal Ninjas MECHA C2.
Follow me on Social Media to get more latest info on 360 VR filmmaking:
➜Oculus TV: https://ocul.us/2PINYMz ➜YouTube: https://www.youtube.com/creatorup ➜Facebook: https://facebook.com/360creator ➜Instagram: https://instagram.com/hugh.hou ➜TikTok: https://www.tiktok.com/@hughhou/ ➜Website: http://film360.video


