Hey, what’s up everybody! It’s Hugh here from CreatorUp – the #1 YouTube channel dedicated to 360 Virtual Reality Filmmaking for everyone. This is not only a OneWheel action shot tutorial – this is everything I know about creating professional-looking over capture 2D video with a 360 camera. I wanted to do this a while ago, but stuck to 360 for my professional audiences. But over capture tutorials blew up after ONE X was released!
I’m going above and beyond to give you 50 filming and editing tips and tricks on over capture video. Hopefully, this is the ONLY tutorial you will ever need to create action packed video like what’s on my YouTube channel.
So, get yourself a cup of coffee or tea, and let’s learn these 50 tips and tricks together!
CAMERAS
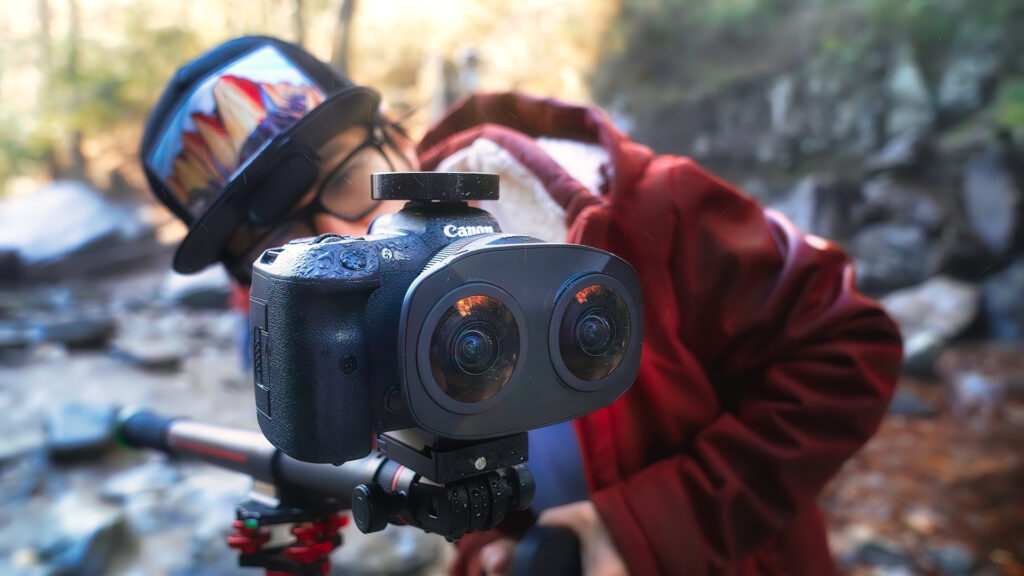
First, Let’s talk about cameras – one of the most asked questions at CreatorUp. The answer is, it really doesn’t matter. Yes, I filmed the video with ONE X. But ONE X is NOT the only 360 camera. GoPro Fusion, which is only $299 right now, Vuze XR, Insta360 Evo with the new fix on 360 stitching, or Kandao Qoocam with super slow motion, are all really excellent options.

The bottom line is, any 360 camera with great stabilization will work. If you don’t have one of these new 360 cameras, you can even use Nikon Keymisson or Samsung Gear. I did it way back in early 2017 with the Nikon Keymission. You just need After Effects for an extra step of stabilization, and then you can follow along with this tutorial.
I used Insta360 ONE X for this tutorial because ONE X is the lightest among all the 360 action cameras. It also has HDR mode, which is a lifesaver when you’re directly under the sun, and I know a lot of my viewers have the ONEX.
SELFIE STICK
Second, you need a selfie stick. Any selfie stick will work, it does not need to be invisible. The invisible selfie stick is just a marketing term – it’s never truly invisible. If you look at my video, you’ll see I’m using the Invisible selfie stick from Insta360. Because of the weight of the camera and the dramatic movement during skateboarding, you can still see the selfie stick. The trick here is to wear black accessories like a leather glove to blend the stick in, or get a solid stick like the brand new Bushman monopod.

CAMERA SETTINGS
Now let’s talk about camera settings. There are only TWO simple rules:
First, get the highest resolution possible from your 360 camera. For ONE X and Vuze XR, it is 5.7K in 30fps. For GoPro Fusion, it’s 5.6K in 24fps. As your 2D over capture video will be eventually in 24fps mix with your DSLR camera, you don’t need to have 30fps like what we usually do for VR headset delivery.
The second rule is the shutter speed. You want to minimize motion blur, so never use the auto camera setting. (Just a rule of thumb in general, never use the auto camera setting on any shoot, period.) Lock your ISO to 100, and adjust your shutter speed to make sure it is above the minimal 60. White balance should also be manual, so your color is not all over the place.
SHOOTING
Okay, now let’s talk about the fun part – shooting. Shooting is fun and easy with a 360 camera. On an electric skateboard like the OneWheel, I use reverse grab, like how you grab a ninjas sword, with the extended selfie stick. I don’t extend the selfie-stick all the way – if you do, the selfie-stick will bend, and it won’t be invisible anymore.
Then, you can just hop on the One Wheel and start filming. This is the most versatile way to film with the 360 camera. You can slightly tilt the camera up for a normal tracking third person above the horizon view. Or tilt the camera down for a Hero follow shot, like what I did in my video. If you have experience in 2D filming, you know that the best B-roll angle is not at your face, but right around your chest. This way also lets you hide the camera really well as that is your natural hand position.
The most frequently used way is the standard grab, extending the stick as far as possible. It’s super easy to create interesting dolly shots like this, and it’s how I created the fake drone shot. You don’t need a long selfie stick to create that “no drone no problem” shot. In fact, I wouldn’t suggest using the “no drone no problem” pole on any electric skateboard -45uIt is very unsafe and safety always come first.
The next one is my personal favorite — the super low angle shot. Traditionally, you need to mount a GoPro on the tip of your skateboard to do this. This is easy for 360 cameras, you just need to point the camera down.

If you want to achieve the effect that someone is following you and filming you from the side, you can hold your camera to your side to achieve the side dolly shot.
Bonus round. To create a truly hands-free invisible camera shot, I have the SailVideoSystem 3rdpersonview body attachment.
Those are all of the basic ways of filming with a 360 camera- don’t be afraid of experimenting with moving your camera around! The more interesting the shot, the more interesting the post production/ final product.
POST PRODUCTION
And now, let’s dive right into Post Production. All the magic happens in POST.
Before we start, let me address some common concerns and my philosophy in 360 post-production- there is no free software or mobile phone app that will help you achieve the best, most professional-looking results. If you want the absolute best quality, you need a dedicated editing software on your computer – like Adobe Premiere, Final Cut Pro, or Davinci Resolve. Your mobile phone is powerful, but it cannot do a better job than a desktop editor!
Same goes with the free software. Yes, you probably already saw some videos about editing and free capturing with the Insta360 Studio. It can free-capture any 360 footage – including the ones from GoPro Fusion, Vuze XR or Kandao Qoocam. The major issue is that it does not allow you to edit based on music and beat. One thing that will DRAMATICALLY improve your video is if it is edited on-beat, because any image that is synced to your music will instantly look cinematic.
Also, none of the free software allows you to edit in 4K in Apple ProRes – which is another very important point specifically for smaller sensor 360 video editing to avoid compression artifacts and that ugly sports camera look. Basically during the entire post pipeline, my philosophy is to keep your video in high resolution and use low compression codec.
STITCHING
Let’s talk about stitching. Both GoPro Fusion and Vuze XR provide you Apple ProRes for editing, which follows my philosophy- but ONE X and EVO don’t.
Many YouTubers suggest no-stitch workflow. If you use Adobe Premiere, that works great. However, unless you bought the ONE X or EVO, no one will tell you that no-stitch workflow isn’t perfect all the time. If your footage has a stitching calibration issue, which is most drone/action shots, you can’t use no stitch with Premiere. The alternative I suggest is importing your raw video into the Insta360 studio.
Lock the direction and find the frame you are going to use. Hit the stitching calibration button until you see a good enough result. Then render out ONLY the portion you need to save storage space from the studio. And the quality has to be Superb in 150Mbps.
After you import all the footage into Premiere, the next thing you immediately do is to generate a proxy for everything. You always edit in Proxy to increase editing speed and productivity. They are still 5.7K 360 videos, so it will slow down your computer unless you edit in Proxy. If you want more information on this, check out this tutorial.
Next is important – setting up your sequence. If you are publishing onto YouTube, you want to set your sequence in 4K. 90% of the Insta360 ONE X over capture videos, including some from famous YouTubers, look super compressed because they are uploaded as 1080P. 1080P looks great if you shoot with a DSLR, but not a small sensor camera like the ONE X or Fusion.
Before you begin editing, choose your music. As you can see in my sequence below, I have a music track and a sound design track for sound effects. Where can you find free music? AudioJungle dot net gives out a free track each month on their website, to start! Usually they cost $20, but are free during this promotion, and are really high quality.
You can also just reach out to producers on YouTube who give out free music in return for exposure, they usually love creative videos and 360 videos like this. You are doing them a favor by featuring them, so don’t be shy to ask.
I picked out an amazing track by Lance Conrad called Taste. The next thing I do is listen to the track and hit the M button on my keyboard to create beat markers. I don’t need to be exact on beats, but now I have a rough idea where I want to either make the transition, do free capture animation, or do tiny planet morphing.
I use GoPro VR Reframe as a standard for every clip on my timeline, it’s a free GoPro plugin. I also put the VR Rotate Sphere before the GoPro VR reframe plugin, for the ease of editing.
Let’s say we have a perfect Tiny Planet here created from the GoPro VR Reframe plugin. To create a Tiny Planet, all you need to do is move the Pitch bar. But now I am not centered, and I want to animate myself into the center. If I touch the Yaw now, I will destroy my perfectly made Tiny Planet, which is super annoying. But we don’t need to animate the reframe plugin. Instead, we will just move the Pan from the VR Rotate Sphere plugin. Just think about this spatially. You want to pan in 360 to move me around the globe. This is a great tip that can potentially save you hours of messing around. BTW, you can find the VR Rotate Sphere under Immersive Video plugin, free with Adobe Premiere.
The only other thing I’m using besides VR Rotate Sphere and GoPro VR Reframe plugins is an adjustment layer on top with color correction and color grading plugins, like Lumetri.
EDITS USED IN VIDEO
I used a lot of funky edits in my video. Here is the breakdown on how to recreate all of them!
- The first one is Fly-in follow. It is great for establishing and opening from a super wide-angle, then transitioning into a medium shot. And all we need to do is to animate the FOV, in this case from 80 to 50.
- Next, we immediately have a 360 glitch transition that matches the kick drum. This is super easy. You insert a keyframe 5 frames before the kick, then copy the same keyframe 5 frames after the kick. In the middle, you just set random settings to make the frame go crazy. There you go, you got yourself a 360 glitch.
- Next, we have a tiny planet (combined with the side following filming technique we just learned.) You just make the Pitch around 90 degrees, and you’ve got yourself a tiny planet.

4.Then for the up-side-down world, you just need to reset the pitch and roll the camera around 180 degrees.
5.For the famous hamster wheel, or sometimes called reverse tiny planet- you just need to pitch 90 degrees while the camera is in up-side-down world.

6. Next, after the low angle shot, if you listen to the music … the lyrics go “just like me”. I think it would be a cool visual to point the camera to me to match the music. You can’t do any of this if you can’t listen to the music! So I simply Yaw 180 degrees or Pan 180 degrees in the VR rotate sphere.

- Now we have a reverse tiny planet cut to a tiny planet on beat – it is actually almost the same clip. But with 2 extremes, it looks great visually. If you can’t find a clip different enough for a dramatic cut in 360 – just find 2 extremes and cut between them. Like tiny planet and reverse tiny planet, OR third person view to first person view – the extremes create an awesome effect.
- Okay, this up-side-down world transition into a faked drone shot is my personal favorite. All I did on the One Wheel is raise my arm and point the camera up. To sell this faked drone shot, I added in a sound effect of an airplane. You can easily find any free sound effect on YouTube or Soundbible.com.
- Next, we have the famous timeshift. Many people were confused, because of marketing, that only GoPro Hero 7 or Insta360 ONE X can do timeshift. But you can create Timeshift with any mobile camera using Adobe Premiere! Again, listen to the music to find the beat you want to use. You can hear me counting by snapping my fingers in my video. I found TWO 4-beat sessions in the music is perfect for timeshift. I mark them down with M on the keyboard, and right-click on the session that I want to speed up. I pick speed and duration, and put in 400 to speed it up 4 times. Very important- in time interpolation – I pick Frame blending instead of Frame sampling. You can’t see the timeshift effect in preview. But after you render it out, you can see it just like the Insta360 ONE X app.
- The next one is a very famous 360 transition that you see practically everywhere. It is the up-side-down world, flipping back into the normal view. Again, create the up-side-down world on the first clip. Then in the second clip, match the same settings on the first keyframe, and then move coupled frames and reset it into normal view.
- The next one is also a very popular edit, the transition from third-person view to POV. Simply animate the pan or yaw by 180 degrees!
- This next one’s kinda crazy – a dolly shot that cuts on beat. What I did is rollover Hayley on the side and follow her with the camera. I just animated the camera angle to always follow her. To make it look cool, you just add in a smooth transition and make sure your keyframes are on beat.
- The next one is my signature edit. So if you use it, please give me a shout-out! I called it the parallax world. It has this really trippy Dolly Zoom Vertigo Effect, all created in POST with a simple 360 camera. All you need to do is move the POV opposite to where you are going. If you add a smooth transition here, it will sell the effect even more. If you position the forward direction center on your screen, you can create a ‘Dr Strange Style’ zoom into a ‘different world’ effect like this – I call it the ‘Power Punch’ transition. It’s done in After Effects, so I will save that for the next tutorial, as After Effects is an even more interesting world that can really improve your production value.
RENDERING & PUBLISHING
Okay, now we can finish the edit. We are going to render everything as Apple ProRes 422, so we are only dealing with 4K video instead of 5.7K, and everything is in ProRes.
We bring the ProRes file back into Premiere, then we clear up the video. The step that separates your video quality from everybody else – the video denoising. Here is a before and after comparison.
Insta360 or any small sensor camera like the GoPro suffer from compression artifacts and full-frame flicker. Since our goal is to achieve the best video quality possible, we have to remove the noise and the flicker – so our footage can match with the regular DSLR in the edit. I have a full tutorial on that – so go check it out!
After denoise, I will render out another pass as ProRes 422, then I will color change, correct, or color grade my footage. I have a tutorial on GoPro Fusion color grading here.
Okay, the last step is rendering and publishing to YouTube. We did so much hard work to make sure the video looks as good as possible, but YouTube is going to compress the heck out of it when you upload. So, to minimize this compression step, we are going to give YouTube the 4K ProRes 422 as the upload file. I know it sounds crazy, but that is the only way to get you the best video quality on YouTube.
That’s it – from start to finish, on how to create the best over capture video from any 360 camera. There is so much more I want to teach you, and this is just the tip of the iceberg. If you are new to the channel and interested in learning more 360 video production and how VR can empower you with immersive storytelling – consider subscribing! I will have more POST tutorials on the ONE X, the Fusion and the upcoming GoPro Fusion 2. So stay tuned, and I will see you next time.


